Category Archives: Dungeon master’s tools

How to print map graphics as battle maps using free software

You can play Dungeons & Dragons and Pathfinder battles on a sketch, playing on a colorful, printed map raises  your game’s visual appeal.

Many of the artists who draw maps for adventures sell downloadable images of those maps. But these computer graphics never come scaled so that they print with a 1-inch grid sized for miniatures. Even when you solve the scaling, the images can’t fit on a single page from your printer.

Purpose

This post gives procedures for scaling graphic map files so they appear with a 1-inch grid, and then printing the map tiled onto multiple pages.

Contents

This post includes the following sub-procedures:

Before you begin

You must have the free programs GIMP and PosteRazor installed on your PC.

GIMP provides an image editor similar to Adobe Photoshop.

PosteRazor splits graphic files too big for a single page into multiple, printable pages, which you can assemble into a poster-sized map.

Opening the map graphic

To open your map graphic in GIMP, do the following:

1 Click File > Open.
2 In the Open Image dialog box, select the graphic file that will become the backdrop for your battle map, and then click Open.

Scaling an image to print

Battle maps in Dungeons & Dragons and Pathfinder feature a grid of 1-inch squares. To print your map image so each square spans 1-inch, adjust its scale so the image’s dots-per-inch matches its number of dots-per-square.

Start by measuring how many dots now span a square on your map.

Note: If your map image lacks a grid, I’ll explain how to add one in Adding a grid to a map image. For now, this procedure refers to 5-foot plots on your map as squares, even if the lines don’t appear yet.

Measuring the dots-per-square on a map image

To measure the dots-per-square on a map image, do the following:

1 Find two landmarks or marks on the map where you know the distance separating them.

If… Then…
the map includes visible grid Pick two parallel grid lines far apart on the map. Count the squares separating the lines.
the map includes a scale Pick the ends of the scale. Read the distance from the scale.
the map lacks a measure of scale Look for features that can establish a scale.
Example: If the map includes 10-foot wide halls, the distance between walls can serve as a scale.
the map lacks any measurable features Estimate a distance between two landmarks that suits play.
2 Click Tools > Measure.
3 Measure the shortest line between your landmarks.

Click one landmark, press and hold the right mouse button, and then drag to the second landmark.

As you drag, the angle of your line appears at the bottom of the window. When you measure a vertical or horizontal separation, drag a 0° or 90° line.

Release the mouse button.

Result: The distance in pixels appears at the bottom of the window.

scale-measuring

4 Calculate the width of a square in pixels.

If in step 2… Then…
you found a distance in squares Divide the measurement in pixels by the number of squares. The result is the width of each square in pixels.

Example: If you measured 330 pixels between grid lines 6 squares apart, then each square is 55 pixels wide.

you found a distance in feet Divide the measurement in pixels by the number of feet. Multiply this result by 5 to get the width of each square in pixels.

Scaling the map image

Once you know the number of dots per square on your map image, scale the image so its dots-per-inch and matches its dots-per-square.

To scale the image, do the following steps:

1 Divide 10000 by the number of dots per square.

Result: This gives the percent scaling needed to make each square 100 pixels wide.

2 Click Image > Scale Image.
3 In the Scale Image dialog box, set these controls:

  • Set the scaling drop-down menu to %.
  • For Width, enter the percentage calculated in step 1. Height will change to match.
  • Set the X resolution value to 100 pixels/in. Y resolution will change to match.

scale-scale

4 Click Scale.

Result: The image scales so each square becomes 100 pixels wide.

Cropping the map image

Most graphics suitable for battle maps include border areas that you don’t need to print. Remove these unnecessary areas by cropping.

To crop a map graphic, do the following:

1 Click Tools > Transform Tools > Crop.
2 Point the cursor to the upper-right corner of part of the image you want in your map, press and hold the right mouse button, drag the pointer to the lower-left corner of your map, and then release the mouse button.

Result: A rectangle highlights the part of the image that will remain after the crop.

3 If you want to adjust the size of the rectangle, point inside its corners or edges, press and hold the right mouse button, and then drag the edge or corner to its new size.
4 Double click the rectangle.

Result: GIMP trims the image to the rectangle.

If your image already includes a grid, skip the next procedure for adding a grid.

Adding a grid to a map image

If your map image lacks a grid, you can add one.

To add a grid, do the following:

1 If you want your grid to align with a vertical feature such as a wall, measure the distance from left edge of the graphic to the wall.

Click Tools > Measure.

Click on the left edge of the graphic, press and hold the right mouse button, and then drag to wall.

As you drag, the angle of your line appears at the bottom of the window. Drag a 90° line.

Result: The distance in pixels from the top of the graphic to the wall appears at the bottom of the window.

2 Calculate the vertical offset by noting just the 10s digit and the 1s digit measured in step 1.

Example: If you measured 123 pixels between the edge of the graphic and a vertical wall, then the vertical offset is 23 pixels.

3 If you want your grid to align with a horizontal feature, repeat steps 1 and 2 to calculate a horizontal offset, but now measure a 0° line from the top of the graphic to the feature.
4 Click Filters > Render > Pattern > Grid.
5 In the Grid dialog box, set these controls:

  • Enter a Width of 3 px.
  • Enter a horizontal and vertical Spacing of 100 px.
  • If you calculated an offset in steps 1 to 3, click the chain links under the Offset setting, and then enter the calculated offsets.
  • If the map features dark colors and a white or gold grid would be more visible, click the first color box and select a lighter color.

scale-gridClick OK.

Result: A grid appears over the map image.

Saving the map image

To save the map image, do the following:

1 Click File > Export As.
2 Select JPEG image from the drop-down menu.
3 Enter a file name that ends with the .jpg extension.
4 Click Export.

Splitting a graphic file too big for a single page into multiple, tiled pages

Most battle maps won’t fit a single sheet of paper. To print a larger map, you must split it into tiles that can print on separate pages.

To split a graphic file into multiple, tiled pages, run Posterazor and do the following:

1 Open a map image by clicking the open folder icon beside the Input image field, selecting the image file, and then clicking Open.

scale-posterazor-1Click Next.

2 Make the following settings:

  • Select a paper format from the drop-down menu. North America typically uses Letter format, while the rest of the world typically uses DIN A4.
  • Enter 0.3 for all the borders. This values limits the map to the printable area of most printers.

Click Next.

scale-posterazor-2

3 Choose the amount of overlap where two edges of one tile repeat on the next page. Choose from two settings:

  • Setting overlaps of 0 saves paper, but forces you to trim pages exactly to avoid white space or missing map. The lack of overlap at the seams between pages makes your map easier to fold.
  • Setting overlaps of 0.25 lets you make imperfect cuts when you trim the pages, because you can align a cut with the overlapping edge of the next page.

Click Next.

scale-posterazor-3

4 Set a Size in percent of 100, and then click Next.

Hint: Posterazor shows a preview of the graphic with the overlap areas marked in red. Count the number of pages shown in the preview image, and then back up to step 2. Switch the page orientation to Landscape, and then advance back through the procedure. Use whichever page orientation uses the fewest pages.

scale-posterazor-4

5 Click the disk icon under Save the Poster, and then select a filename and location for a PDF version of the map.

Result: Posterazor saves a multi-page PDF version of your map that you can print.

scale-posterazor-5

6 Print the map from your PC’s PDF viewer.
7 Cut the 0.3-inch unprinted edges from your pages and tape them together into a map.

Related

Mike Schley sells his map graphics for many of the current Dungeons & Dragons adventures.

Jarod Blando sells his maps for Out of the Abyss.

NewbieDM explains how to scale maps using PhotoShop.

Improved fifth-edition dungeon master screen and initiative tents

When the first set of fifth-edition Dungeons & Dragons basic rules arrived, I created dungeon master screen inserts. I put these pages in my mini screen from Hammerdog Games. Others have attached them to screens of their own creation. As I have used my screen, I noticed that I never reference some panels, and that some questions still often lead me to the books. Based on experience, I revised my screen inserts.

Download the updated dungeon master screen inserts.

The new PDF includes all the pages in the old set, but adds some new pages, and tweaks the old pages. Choose which pages to use.

Mini dungeon master's screen on table

I never looked at my screen’s list of skills and tool proficiencies, so I replaced this panel. Instead, I added an insert for encounter building. When I improvise an encounter, I typically reference the Experience Thresholds by Character Level table. This table helps me avoid creating an easier or harder fight than I want. Also, the table offers a handy guide for awarding experience for non-combat encounters.

My screen will also lose the insert for movement types. I don’t need a whole page to tell me that slower forms of movement cost an extra foot for each foot moved.

I still wanted the table of typical difficulty classes and the jump distances, so I copied those items to a new panel. This replacement adds the effects of cover and the DCs for tracking and concentration checks.

Everyone knows you can use an action to cast or attack, right? In place of these obvious entries, the table of Actions in Combat adds rules for grappling and shoving .

Finally, my existing screen had no rules facing the players, only pictures. I yanked one of the pictures and added the table that shows experience points needed to level. I hope players stop asking me how many points they need to level up.

Initiative tents

Initiative tents

I also updated my initiative tents for fifth edition. The player tent loses the insight score and adds a place for armor class. The monster tent replaces the various defenses with the three most common saving throws. On the player-facing side, I added a big box for armor class. Sometimes, I speed combat by marking the AC where everyone can see. You can set these tents on the table or hang them atop your DM screen. For more on using the tents, see “Everything I know about tracking initiative.”

Download the initiative tents.

Dungeon master’s tools and miniatures update

In this post, I offer additions to my dungeon master’s tools, notes on miniatures, and some tavern decor.

Gaming Paper

In October 2013, when I presented my photo guide to dungeon master’s tools, I still ran fourth-edition Dungeons & Dragons, which meant the combat encounters typically featured poster maps or dungeon tiles. Fifth edition’s quicker, more numerous fights mean I’m sketching most encounters on a grid. In addition to using dry- and wet-erase battle maps, I sometimes draw dungeons on Gaming Paper. This paper resembles gift wrap, except rather than balloons or Santas, it features a 1-inch square or hex pattern. Unlike erasable maps, the paper offers permanency, so you can store and pack the maps without rubbing marks away. Plus, you can draw a bunch of maps before a game without running out of flip-mat.

Drawing a dungeon as it's explored on gaming paper

Gaming paper can reveal a dungeon as it’s explored

Giants, size, and miniatures

Fifth edition changed giants from large size, as in third and fourth, to huge size. I approve. Giants needed a boost over ogres and trolls. The stone and frost giant miniatures in the Tyranny of Dragons compare in size to earlier huge figures, such as the titans in the old D&D miniature line. Despite the growth, the new giants continue to use large-size bases, probably so the figures fit in the retail box. The 5E designers seem to fear that the size change will enrage collectors of giant figures on undersized bases, so the Dungeon Master’s Guide states, “If the miniature you use for a monster takes up an amount of space different from what’s on the table, that’s fine, but treat the monster as it’s official size for all other rules.”

Large storm giant and huge frost giant, both on large, 2" by 2"  bases

Large storm giant and huge frost giant, both on large, 2″ by 2″ bases

Do not accept this compromise. For fifth edition, set giant figures on huge-size, 3-inch bases so these monsters take the proper amount of space on the battle map. I’ve used the large-to-huge expansion rings that came in the old Monster Vault, but this only saves me the five minutes needed to cut 3-inch disks from cardboard.

Attack wing flying miniatures

Every time a new line of randomly packaged miniatures reaches stores, gamers protest the random assortments. Many people insist on buying exactly the figures they need and believe that the blind packages prevent them from getting what they want. But they can avoid the random packs by getting figures as singles from internet resellers. If you want common figures rather than the splashy rares, then singles come cheaper. When a new set arrives, I typically buy some boxes to start a collection, then buy singles to fill gaps and to get groups of useful figures.

The D&D Attack Wing Starter Set includes 3 dragons

The D&D Attack Wing Starter Set includes 3 dragons

For Tyranny of Dragons, I wound up short some of the flying dragon figures. The dragons look great, but I balked at their steep prices as singles. So the Attack Wing Miniatures Game Starter Set seemed like an ideal purchase. The box packs 3 dragon figures like the ones from the Tyranny of Dragons miniature set. These would cost much more as singles. Plus the box includes the game.

Attack Wing Red and Tyranny of Dragons dragon

Attack Wing red dragon on its short post compared to Tyranny of Dragons green dragon

The drawback: The Attack Wing versions only fit atop shorter posts intended to work with the game’s bases—bases too big for D&D’s one-inch grid. The good news: The short posts fit the Tyranny of Dragons bases. Your players will only notice how cool the Attack Wing dragons look, not that they fly an inch closer to the table.

Update: The Attack Wing posts fit together to create extensions. You can use the extensions to show a creature’s altitude. This makes the Attack Wing figures more versatile than the ordinary miniatures.

Spell Cards

When I first saw pictures of Game Force Nine’s fifth-edition Spellbook Cards, the cards seemed like a strained effort to find something to sell for the new edition. After all, friendly neighborhood game stores everywhere still have fourth-edition power cards gathering dust, marked 50% to 75% off.

D&D Spellbook Cards - Arcane

D&D Spellbook Cards – Arcane

My assessment changed. I plan order the Spellbook Cards at my FLGS. My new outlook stems from my post on not hoarding spells, the new players at my D&D Encounters table, and my wish to avoid total party kills. Battles keep turning against players, while their spellcasters choose cantrips over the spells that could win victory.

In fourth edition, complete power descriptions appeared every character sheet, so players never failed to use their dailies and encounter powers. Now the spell descriptions stay locked in the Player’s Handbook. Players skip their unfamiliar spells and spam Firebolt.

I plan to hand new spellcasters a few spell cards that can help them tap their character’s potential. I hope to avoid dead characters and reduce the need to coach from behind the DM screen.

The cards may help me too. I will pull spell cards for enemy casters and clip them to my DM screen. No more pausing the action so I can search for a spell description.

Dungeon Decor

I collect miniature figures for unarmed non-player character, from royalty to beggars. Setting them on the map helps set the scene in a tavern, street, or throne room, plus the figures discourage players who tend to think every NPC with a miniature represents an enemy to fight. In addition to miniatures for non-combatants, I’m enchanted by miniature-scale props that sit on a battle map and make the game more vivid.

Tavern Dugeon Decor

Tavern Dungeon Decor

The Kickstarter for the Dungeon Decor Tavern set suits me perfectly. I added on to my pledge for extra tables and chairs. Players often move their characters over tables and chairs printed on a map as if they present no more obstacle than a rug. Your armored dwarf is not so light on his feet. If my next bar brawl includes 3-D tables and chairs, I’m certain the players will treat them as terrain rather than as a colorful pattern.

What things do I need to play Dungeons & Dragons?

If you have seen the Dungeons & Dragons played on TV or in a live play video, you might suppose that playing requires a lot of maps, miniatures, props, and other gear. While many players enjoy using the accessories, D&D is a game of imagination that requires dice and virtually nothing else. Many players prefer to keep play in their imagination, unburdened by gear.

The things you need for a Dungeons & Dragons game depends on your game’s style and how much you wish to spend.

Required: Rules and Dice

To start, all you really need rules and dice.

Start with the free-to-download Basic Rules. Print some blank character sheets from the one that appear at the end of the basic rules.

D&D uses an unusual set of dice, each with a different number of sides.

d4 d6 d8 d10 d12 d20

4-sided 6-sided 8-sided 10-sided 12-sided 20-sided

d100The ten-sided die shows a 0 on one side, but that counts as a 10. Some dice sets include a second 10-sided die numbered from 00 to 90. To generate a number from 1-100, you add a roll on this die with a roll on the other d10 , with a roll of all zeroes counting as 100.

Ten-sided dice with just 10 sides first appeared for sale in 1980. Before that, players rolled a twenty-sided die numbered from 0 to 9, twice. Those rounder d10s roll better, so I prefer them over the modern version, but I stopped using them. Whenever I made a damage roll with my 20-sided d10s, my players would panic. What sort of monster rolls d20s for damage! I will happily interrupt a post for a gaming history lesson, but not a combat encounter.

You just need one of each die, but many rolls add more than one result from the same size die. If you buy extra dice, you can make these rolls faster by throwing several dice a once. Veteran players tend to collect bags of dice.

More rules options

You could play D&D for years without anything more than the basic rules, but most players eventually seek even more options.

The Player’s Handbook expands your character options and makes a good first purchase.

In Dungeons & Dragons, the Dungeon Master (DM) acts as the games referee and storyteller. If you want to be a Dungeon Master, the Monster Manual adds monsters beyond those in the free Basic Game. The Dungeon Master’s Guide can wait until you’ve run a few games and feel an urge for more advice, options, or magic items.

Some DMs prefer to start with a published adventure. The Dungeons & Dragons Starter Set includes the adventure Lost Mine of Phandelver which ranks as an excellent adventure and a good start for new DMs. Of course, many DMs prefer to dream up their own adventures.

Optional: Battle map

Unlike some earlier editions, the latest version of Dungeons & Dragons enables you to play combats in the theater of the mind, a fancy way of saying in your imagination.

Theater of the mind works well for small battles, but for most encounters, I favor playing on a grid of 1-inch squares called a battle map. Blank, reusable battle maps let you draw walls and other features, and then wipe them clean.Doomvault Golem Foundry

The Pathfinder flip-mat works with both wet- and dry-ease markers and folds for easy storage. When laid out, the mat tents a little at the creases.

The Chessex Battemat rolls out and lays flat, but the rolled map is harder to carry. This vinyl map limits you to wet-erase markers.

Even if you choose to run some fights on a battle map, you do not need to invest in miniatures. Instead, just use any tokens that you can tell apart. For example, a lot of convention judges use Starbust candies to represent creatures on the battle map. They come in a variety of colors, and players like to eat the monsters they slay. You can also use 1-inch washers or game pieces from other games. NewbieM explains how to create tokens from inexpensive materials. D&D is a game of imagination first.

Optional: Dungeon Master Screen

Many DMs prefer to work without a screen that divides them from the group, but I favor a screen.

Mini dungeon master's screen on tableIn my very first post, I listed five reasons I use a DM screen. Mainly, I like keeping my notes secret. Most players avoid snooping, but with a screen no one has to worry about catching sight of a spoiler. If you decide to use a screen, you can purchase one, use my rules inserts, or make your own screen.

Even if you usually opt for a screen, you do not always have to use it. Sometimes when an adventure reaches an interactive section, I lay my screen flat and portray non-player characters without a barrier.

Accessories

For more gear options, see my “Photo Guide To Dungeon Masters Tools.”

Fifth-edition Dungeons & Dragons spell, special ability, and rules reference sheets

When I run fifth-edition Dungeons & Dragons games, I find myself constantly turning to the Player’s Handbook to see if some spell requires an attack roll or a save. Then I close the book and realize that I forgot to check the damage. At the end of the session, I tally experience and every player wants to know how much they need to level. Back to the book.

quick reference thumbnailAce dungeon master and D&D Championship teammate Tom Christy comes to the rescue with a set of compact reference sheets. One pair of sheets covers spells and special abilities. Another sheet somehow includes every rule in the game, with space remaining for a list of Forgotten Realms holidays. (I’m not kidding about the holidays; I may be exaggerating about all the rules, but I cannot be certain.)

You can download the sheets here.

D&D 5E spell and special ability reference (PDF)

D&D 5E quick reference (PDF)

The sheets include the following abbreviations:

B = bonus
C = concentration
S = self
T = touch
cr = creature
obj = object
D = duration
AD = advantage
DA = disadvantage
lv = level
/ = or
+ = and
Neg = negates
Thp = temp hp
SS/DS/… = Strength Save, Dex Save, etc.
SC/DC/… = Strength Check, Dex Check, etc.

Update: Sheets updated January 2, 2015

Mini Dungeon Master’s screen for fifth-edition Dungeons & Dragons

For reasons explained in my post “Dungeon master’s Screen,” I tend to use a screen. Standard-sized screens stand too tall for my taste, so I prefer the 6-inch-tall mini version of the World’s Greatest Screen from Hammerdog games. This screen is constructed like a loose-leaf binder, with clear-plastic pockets on both sides.

Mini dungeon master's screen on tableI have created rules inserts for fifth-edition Dungeons & Dragons, which you can download as a PDF file. Put them in the Hammerdog screen, or just put the inserts on cardboard and fabricate your own screen. You’ll need to add your own pictures.

Update: My improved inserts include more panels that you may need. Choose the ones you find most useful.

Update: NewbieDM used my rules inserts as part of his own homebrew DM screen.

Gallery of poster battle maps published for Dungeons & Dragons

I have collected over 100 poster battle maps from various Dungeons & Dragons adventures and other products. Although these maps originally supported particular scenarios or adventures, I reuse them for new adventures.

The Slaying Stone (1)

The Slaying Stone (1)

To make the most of my collection, I needed a gallery that I could browse to find the best map to suit new an adventure, so I created one. Soon, I plan to create an page sorting maps into categories such as dungeons, ruins, towns, and villages. For now, I present galleries sorted by product category.

Battle maps in fourth-edition D&D products

D&D Encounters poster maps

D&D Fantastic Locations and map packs

D&D Lair Assault poster maps

D&D promotional and miscellaneous maps

The best poster battle maps published for D&D

Soon, I will post a catalog of the poster maps printed for Dungeons & Dragons products over the years. As I compiled the catalog, some maps stood out, either because of the design, or because the maps proved useful beyond the adventure that they accompany.

The Gates of Firestorm Peak adventure supported Player’s Option: Combat & Tactics with color battle maps. Artist David Martin painted these maps in a hallucinogenic palette rather than the more earthy colors of current maps. See “Battle maps take over Dungeons & Dragons” for more on Firestorm Peak.

The Gates of Firestorm Peak (1)

The Gates of Firestorm Peak (1)

The Gates of Firestorm Peak (2)

The Gates of Firestorm Peak (2)

The Gates of Firestorm Peak (3)

The Gates of Firestorm Peak (3)

The Gates of Firestorm Peak (4)

The Gates of Firestorm Peak (4)

Does the next map look familiar? The moathouse from The Temple of Elemental Evil returns as a map in the Village of Hommlet promotional adventure (of course), and also in the Against the Cult of Chaos Encounters season and the Shattered Keeps map pack.

The Village of Hommlet - 2009 promo (2)

The Village of Hommlet – 2009 promo (2)

Three map sets included double maps that fit together into a single large location. Both Fantastic Locations: Fields of Ruin and Shattered Keeps feature a sprawling ruined castle. The Vaults of the Underdark map pack includes a river and bridge that may be underground, but could also be out in the badlands.

Fantastic Locations: Fields of Ruin - Keep of Fallen Kings I

Fantastic Locations: Fields of Ruin – Keep of Fallen Kings I

Fantastic Locations: Fields of Ruin - Keep of Fallen Kings II

Fantastic Locations: Fields of Ruin – Keep of Fallen Kings II

Vaults of the Underdark map pack (3)

Vaults of the Underdark map pack (3)

Vaults of the Underdark map pack (6)

Vaults of the Underdark map pack (6)

Before Wizards of the Coast started packaging battle maps in every adventure, they published maps intended for D&D miniatures battles. The underground maps include broken walls, which make them unsuitable for dungeon crawls but good for big battles. Of the miniatures maps, I favor the neon colors of Fantastic Locations: Fane of the Drow.

Fantastic Locations: Fane of the Drow - Drow Enclave

Fantastic Locations: Fane of the Drow – Drow Enclave

Fantastic Locations: Fane of the Drow - Fane of Lloth

Fantastic Locations: Fane of the Drow – Fane of Lloth

Fantastic Locations: Fane of the Drow - Tomb of Queen Peregrine

Fantastic Locations: Fane of the Drow – Tomb of Queen Peregrine

Fantastic Locations: Fane of the Drow - Mithral Mines

Fantastic Locations: Fane of the Drow – Mithral Mines

If you spot a copy of the third-edition adventure City of Peril for sale, snap it up. This adventure comes stocked with maps of a town square, an inn, rooftops, and sewers.

City of Peril (1)

City of Peril (1)

City of Peril (2)

City of Peril (2)

City of Peril (3)

City of Peril (3)

City of Peril (4)

City of Peril (4)

Recently I stumbled on a StackExchange question asking why used copies of the fourth edition Dungeon Master’s Kit cost so much. I suppose some buyers covet the monster tokens, but for me the maps are the real draw. I have used the castle wall in at least 8 sessions.

Dungeon Master’s Kit (1)

Dungeon Master’s Kit (1)

Dungeon Master’s Kit (2)

Dungeon Master’s Kit (2)

Dungeon Master’s Kit (3)

Dungeon Master’s Kit (3)

Dungeon Master’s Kit (4)

Dungeon Master’s Kit (4)

I love the waterfall and magic circles included “Forest Cliff Lair” map included in Fantastic Locations: Dragondown Grotto and Keep on the Shadowfell. This map fires my imagination more than any other.

Fantastic Locations: Dragondown Grotto - Forest Cliff Lair

Fantastic Locations: Dragondown Grotto – Forest Cliff Lair

Unlike later adventures with a single poster map, Keep on the Shadowfell included three. In addition to the “Forest Cliff Lair,” the package includes the useful “King’s Road” map, originally from Fantastic Locations: Fields of Ruin.

Fantastic Locations: Fields of Ruin - The King’s Road

Fantastic Locations: Fields of Ruin – The King’s Road

Most of the Lair Assault adventures include specialized maps, but Kill the Wizard includes a three-story house and Talon of Umberlee features a ship.

Lair Assault: Kill the Wizard (1)

Lair Assault: Kill the Wizard (1)

Lair Assault: Talon of Umberlee (2)

Lair Assault: Talon of Umberlee (2)

I have reused the waterfront map from Lost Crown of Neverwinter in more than one session.

D&D Encounters 06 Lost Crown of Neverwinter (5)

D&D Encounters 06 Lost Crown of Neverwinter (5)

The village map in King of Trollhaunt Warrens and War of Everlasting Darkness strikes me as particularly eye catching. I wish it connected with the similar map in the third-edition adventure Red Hand of Doom.

P1 King of Trollhaunt Warrens (2)

P1 King of Trollhaunt Warrens (2)

Red Hand of Doom (1)

Red Hand of Doom (1)

A map in Storm over Neverwinter turned the graphic assets from the Castle Grimstead dungeon tiles set into a grand palace.

D&D Encounters 13 Storm Over Neverwinter (2)

D&D Encounters 13 Storm Over Neverwinter (2)

Of all the seasons of D&D Encounters, the Web of the Spider Queen featured the most memorable encounter site: a hollowed out stalactite with bridges connecting three levels.

D&D Encounters 09 Web of the Spider Queen (6)

D&D Encounters 09 Web of the Spider Queen (6)

Finally, I have two mystery maps that must have been included with Dungeon or Dragon magazines around 2006. I can’t figure out what magazine issues included these maps. If you can help, please comment.

2006 Magazine Map

2006 Magazine Map

Dungeon Magazine Map

Dungeon Magazine Map

Photo guide to dungeon master’s tools

Update: Read my bigger, updated New photo guide to dungeon master’s tools.

As a dungeon master or game master, you can run a fun game with almost no gear, just a couple of dice, a pen, and some note paper.  I prefer to operate on the other end of the spectrum, with a full array of miniatures, markers, and props. This guide takes a tour through the tools in my DM’s kit. You do not need any of this equipment, but I suspect you will see some items to add to your  case.

On the game table

On the game table

Compartment case

Most of my essential gear fits into a translucent-plastic, compartment case. Removable dividers make the compartments’ size adjustable. As visible in the photo, I half-filled some of the compartments with foam rectangles. This prevents miniatures from banging around and makes small items easy to reach. When I need space for a larger miniature, I pluck out the foam for extra room. When I travel light, I only need this case and a battlemap for a game.

Deep compartment case

Deep compartment case

Dungeon master’s screen

I typically use a DM screen. I prefer the 6” tall mini version of the World’s Greatest Screen from Hammerdog games. This screen is constructed like a loose-leaf binder, with clear-plastic pockets on both sides. I filled the DM-side pockets with the tables and rules I needed most at the table. Stuff the players’ side with your favorite fantasy art.

I have created rules inserts for fifth-edition Dungeons & Dragons, which you can download as a PDF file. Put them in the Hammerdog screen, or just put the inserts on cardboard and fabricate your own screen.

You can learn why I choose to use a screen and download my fourth-edition inserts in “Dungeon master’s screen.”

Behind the dungeon master’s screen

Behind the dungeon master’s screen

Battlemap

I always carry a blank battlemap. The Pathfinder flip-mat works with both wet- and dry-ease markers and folds for easy storage. When laid out, the mat tents a little at the creases.

The Chessex Battemat rolls out and lays flat, but the rolled map is harder to carry. This vinyl map limits you to wet-erase markers.

When I use folded poster maps, I typically make the map lay flat by covering it with a Lexan Polycarbonate Sheet—the sort of material used for storm windows. The Lexan sheets cost more than Acrylic, but they resist cracking. By using wet-erase markers, you can write on these sheets and then erase. Purchase these sheets from your local home-improvement store for under $20.

Battle map under plexiglas

Battle map under Lexan

When I use Dungeon Tiles, I arrange them on sheets of non-slip drawer liners, available anyplace that sells housewares. The liners grip the table and keep the loose tiles in place. These lightweight liners easily roll up for transport.

Shelf lines keep tiles in place

Shelf lines keep tiles in place


Removable mounting putty

Removable mounting putty

For all but the simplest layouts, loose tiles take too long to arrange on the table, so I like to assemble maps in advance. I use removable mounting putty to stick the tiles on foam-core art boards. Office supply stores sell both the boards and the putty. Get the Removable Adhesive Putty, and not clear removable mounting dots, because the clear stuff sets after a while and will damage the tiles.

For more one dungeon tiles, see my “complete list and gallery of Dungeon Tiles sets” and “complete guide to using Dungeon Tiles.”

I transport my maps and Lexan sheet in a inexpensive, artist’s portfolio case.

Rolling in a box

Clear box for dice rolling

Clear box for dice rolling

For reasons explained in “Rolling in a box,” I always make die rolls in full view of the players. To keep my dice corralled, I roll into a clear, plastic box purchased from a craft store. The box packs easily, takes little space on the table, and never hides the outcome of a roll.

Status markers

Alea tools magnetic markers in case

Alea Tools magnetic markers in case

Plenty of folks use cheap or free methods for tracking status effects on the battlemap. When I started with fourth edition, I twisted pipe cleaners into rings and tried using the rings as markers, but this approach fell short. At best, only I knew what status corresponded to a particular color. By the time everyone else adds their bottle-cap rings, tiny rubber bands, and other refuse to the battle, the miniatures look like Christmas trees and no one knows what’s going on. Ultimately I invested in a set of Alea Tools magnetic status markers. You can mark the edges of these markers with adhesive labels so everyone can read the status names. The markers cling in place, and a storage case makes organization easy. When I lack miniatures for a game, I use my numbered markers as tokens.

Numbered alea markers

Numbered and labeled Alea markers

When Dungeons & Dragons Next supplants fourth edition and eliminates much of the need for markers, I will miss them. However, I’ll always use the numbered markers to tell one identical monster figure from another on the battlefield.

Plastic markers

Colored marking dots

Colored marking dots

Colored plastic disks provide any easy way to mark the location of things like a key, a magical glyph, or a wall of fire on the battlemap. Because the disks lay flat, miniatures will sit on top of them. I purchased my set from a convention vendor. You can also buy plastic counters online.

Sometimes, I use these dots to resolve area-effect attacks that target a large number of figures. I lay a colored disk by each figure, then roll attack dice in colors matching the disks.

Colored dice and marker dots

Colored dice and marker dots

The colors link the attack rolls to the figures, so I can roll a handful of dice once to resolve all the attacks.

This method works best when I’m playing, because I can set my disks without interrupting other business at the table. As a judge, I typically just ask a player to point out targets for individual rolls.

Marking zones and areas of effect

To designate zones and areas of effect on the battlemap, I use three types of markers:

  • 3×3 colored transparencies.  I keep a set of transparent, colored sheets clipped to the inside of my DM screen. Whenever someone drops, say, a cloud of darkness, I can lay down a sheet on the battle map. Because you can see through the sheets, the terrain stays visible. Typically, you only have to lift one or two figures to place a small sheet, which is easier and faster than marking each of the area’s four corners. You can purchase the transparencies from American Science and Surplus.

    Area of effect markers

    Blue transparency and yellow boundary markers

  • Boundary markers. These plastic angles mark the four corners of square areas. The boundry markers from Litko Game Accesories come cheap, work for any size area, and allow the miniatures to stay put.
  • Area-of-Effect Templates. For third-edition D&D and descendents like Pathfinder, I recommend the wire templates from Steel Sqwire. Frugal gamers can bend and snip templates almost as nice from coat hangers.

    Steel Sqwire area of effect templates

    Steel Sqwire area of effect templates

For more, see “Marking Zones and Areas in Fourth Edition D&D.”

Line-of-sight indicator

Line-of-sight indicator in retracting spool

Line-of-sight indicator in retracting spool

A line-of-sight indicator reels out a string that you can stretch between figures on the battlemap to see if obstacles block the line. The string is spring loaded, so it draws back automatically like a tape measure. Paizo sells these, but office supply stores and Amazon offers the same item as a retractable badge holder.

Initiative tents

I track initiative using folded, card-stock tents with names written on both sides. I drape the tents across the top of my DM’s screen in initiative order. If you work without a DM screen, or prefer to delegate initiative to the players, you can stand the tents on the table, lined up in order.

Initiative tents

Initiative tents

You can find more advice and my printable initiative tents at “Everything I know about tracking initiative.”

Pens, clips, and scissors

Obviously, your DM kit requires regular pens and pencils as well as wet- or dry-erase pens suitable for your battle map. I bring clips so I can affix maps and pictures to my DM screen in the players’ view. Any convention DM must carry scissors to cut apart certificates and player hand outs.

Scissors, pens, clips, and post-it flags

Scissors, pens, clips, and post-it flags

Post-it flags enable me to affix reminders to my initiative tents, so I can remember when conditions lift, and when the purple worm will burst from the floor.

Poker chips

Poker chips

Poker chips

I give players poker chips to represent action points. Different colored chips can also account for magical talismans, blessed elixirs, keys, and other items players must collect or use during the course of an adventure.

Miniatures

As I confessed in “Lair Assault: Kill the Wizard – I made a Drowslayer,” I enjoy representing the action on the table with the correct miniatures.

My DM case always includes an assortment of two types of miniatures:

  • Bystanders and civilians. As I wrote in “Using your players’ metagaming to mess with their heads,” miniature figures for unarmed civilians can serve as bystanders to be protected as moving obstacles. Civilian figures can set a scene and defuse the players’ notion that every figure is a threat. You can find townsfolk from TurnKey miniatures, Dungeon Crawler, and Reaper’s Bones lines.

    Bystander and civilian miniatures

    Bystander and civilian miniatures

  • Animal companions. Fourth edition made various types of animal companions more playable than any previous edition. In my experience, pets resonate for some players, and they collect as many the rules allow. However, players of pets rarely bring figures for their entourage, so I bring an assortment to lend. Now if only some vendor would create a medium-sized figure for the runaway most popular animal companion—the displacer beast.

    Animal companion miniatures

    Animal companion miniatures

For a list of other miniatures that I keep close at hand, see “The 11 most useful types of miniatures.”

To avoid the expense of miniatures, you can substitute tokens, Alea markers, or candy—tell players, “If you kill it, you eat it.”

Flight stands

Miniature flight platform

Miniature flight platform

The flying figure stands from Litko game accessories offer a way to mark airborne figures. The stands allow you to position one figure over another, or to set a die under a flying figure to indicate elevation. The flight stands come in three pieces that require assembly. Typical CA glue will fog the clear acrylic, so I suggest using the Craftics #33 Thick Acrylic Cement. Use nail clippers to trim the long tabs on the vertical support so they fit flush with the base and platform. Pack the stands carefully, because they snap easily.

Props

Potion vial prop

Potion vial prop

I carry a couple of corked glass vials from American Science and Surplus. While completely unnecessary, I find them enchanting and I sometimes use them as prop potions.

Dungeon decor

While completely inessential, I pack some miniature dungeon decor to add to the battlemap. Figures such as chests, statues, and altars can add three-dimensional flavor to the battlemap, while calling attention to important features. Ballistas appear in enough adventures to make a figure useful. The photo below features items from more recent D&D miniature sets and from Legendary Realms. Reaper’s Bones line also includes some unpainted decor.

Dungeon decor

Dungeon decor

Complete guide to using Dungeon Tiles

I like Dungeon Tiles. They look good at the game table, while costing far less than fancier alternatives such as Dwarven Forge terrain.

Basilisk encounter on Dungeon Tiles

As nice as the tiles look in play, they present a bunch of problems. Thanks to my own ideas and some suggestions from other gamers, I’m ready to offer solutions.

Problem Solution
Tiles slide on the table during play. Spread shelf liners
non-slip drawer liner
Arranging the tiles on the table takes time, even if you gather the correct tiles ahead of time. Temporarily affix tiles to presentation boards
Scotch removable mounting putty
Finding the tile you need from among more than twenty sets is difficult. Refer to my complete list and gallery of tile sets
Loose tiles defy organization because they lack set markings. Color code tiles by marking edges
Striped Dungeon Tiles
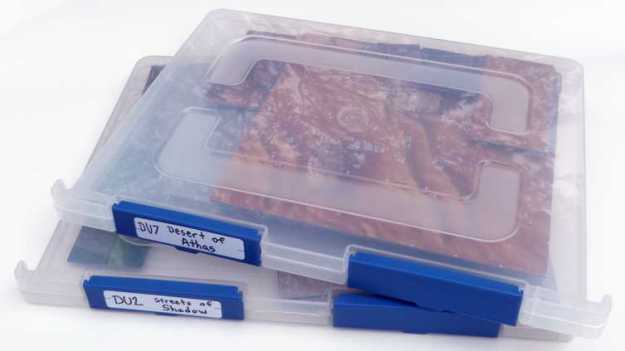
Loose tiles require storage. Choose boxes for tile storage
Dungeon Tiles in hanging project cases
Arranging maps from assorted, loose tiles is cumbersome because of the volume of tiles and the need to keep flipping them to see both sides. Use Pymapper to design layouts
Pymapper

Spread shelf liners to keep tiles in place on the table

Spread sheets of non-slip drawer liner, available anyplace that sells housewares. The liners grip the table and keep loose tiles in place. The lightweight material easily rolls up for transport. If you create a map that you want to recreate later, snap a picture for later reference, and then drop the tiles in a bag or a project case.

Temporarily affix tiles to presentation boards

For all but the simplest layouts, loose tiles take too long to arrange on the table, so I like to assemble maps in advance. Use removable mounting putty to stick the tiles on foam-core art boards. Office supply stores sell both the boards and the putty. Get the white putty, and not clear removable mounting dots, because the clear stuff sets after a while and will damage the tiles.

Dungeon tiles on a foam core board

Once you attach the tiles to boards, you can transport the maps by slipping them into an artist portfolio case. Portfolio cases can be purchased for as little as 10 dollars.

Color code tiles by marking edges

Did your mom force you to keep each color of Play-Doh separate to keep it bright and pristine? Like colors of Play-Doh, Magic cards, and miniatures, Dungeon Tiles work best when you mix them up. Magic cards and plastic miniatures come printed with set markings, so you can mix them up, then put them back where the belong. Because Wizards of the Coast lacked the foresight to print set markings on each tile in invisible, UV ink, we must find our own solutions for the tiles.

A quick web search for “invisible uv ink pen” will turn up pages of vendors selling selling pens that write with invisible ink that appears under an ultraviolet light. Many of the pens come with battery powered UV lights. I have yet to try these pens, but they suggest a simple way to mark tiles.

Update: I tried an invisible UV ink pen. The ink doesn’t stick to the tiles well enough to provide an invisible marking. However, as inexpensive favors for a kids’ party, these pens will thrill the youngsters.

In Dungeon Tile Storage and Really Useful Boxes, DigitalMage gave me the idea of marking tiles by using a marker to add stripes to the edge. This provides a brilliant solution because the codes are clear to see, but do not mark the printed surface of the tiles. You can add the stripes easily, and even mark a stack of tiles with a few, quick strokes of the pen.

Striped Dungeon Tiles

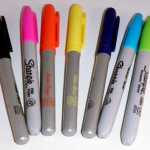
Rainbow markersThe DigitalMage suggests making from 1 to 3 stripes to represent a set series and from 1 to 7 stripes indicate set number—up to 10 stripes per tile. I lack the patience for that, so I recommend using color codes. I purchased a couple of eight packs of permanent markers, and then tested the markers on the edge of a punched tile sheet. This revealed ten markers with colors distinct enough to work as color codes.

For color-coding tiles, select 7 or 10 marker colors that appear distinct on the edge of a dungeon tile. When you punch tiles from a sheet, mark the edges.

Three colors for Dungeon Tiles master setsRefer to my complete gallery of Dungeon Tile sets for recommended codes. My system repeats the same 7 hues for the seven sets in each of the DT, DN, and DU series of tiles. I use peach, pink, and sky blue for the Master Sets.

Sorry kids, I have no solution for the Play-Doh problem.

Choose boxes for tile storage

Schemes for organizing tiles fall into two broad categories:

Organize by content

Organizing by content works best if you like to spread out the tiles and build maps on the fly. Start by arranging tiles by into terrain types such as dungeons, caverns, sewers, cities, outdoor, and so on. From there, you can sort by size.

Really useful boxes and Dungeon Tiles

The DigitalMage presents an terrific example of this approach in Dungeon Tile Storage and Really Useful Boxes. Really Useful Boxes recently launched their product line in the United States, opening this option to gamers in the U.S.

Organize by set

Organizing by set works best if you want to recreate layouts from sources like Living Forgotten Realms adventures, or if you want to build a map arranged on computer. For this system, just drop all the tiles for a particular set in a bag or a flat box. This slim  project case offers enough space to store unpunched tile sheets, but I prefer this hanging project case.

Dungeon Tiles in hanging project cases

The case lacks enough space for unpunched tile sheets, but punched tiles of every size fit. The hanging cases store easily in file cabinets or in boxes designed for file folders. Use file folder labels to mark the cases. In this EN World thread, Buzz shows how to pack tiles into hanging project cases, and then into an easily-transported tote.

Use Pymapper to design layouts

I’m certain some Dungeon Masters enjoy upending a box of tiles on a table and arranging a dungeon, but not me. For one, no table offers enough space. And you cannot see both sides of a tile at once, so arranging scattered tiles inevitably involves a lot of flipping.

Designing dungeons with the PyMapper program

Designing dungeons with the PyMapper program

For designing tile layouts, I highly recommend the Pymapper program. (‘Py’ because the program is written in the Python programing language.) Pymapper lets you draw maps by dragging Dungeon Tiles from a palette onto a map grid. The palette shows both sides of each tile at once. The program allows easy rotating, flipping, and layering of tiles. Pymapper’s developer works actively to provide updates and improvements to the software.

The one hassle with Pymapper is that, for copyright reasons, the program does not include images of the dungeon tiles. However, you can some tiles on the Pymapper site.

Do you have any suggestions for using Dungeon Tiles?

For similar advice on miniatures, see my post on organizing miniatures.